| Index | |||
|
||||||||||||
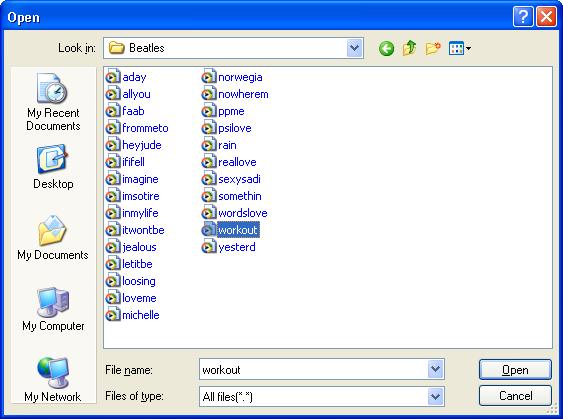
This option allows you to add files to an existing archive. Please note that prior to using this function you should have an existing archive file open. When you click on the Add option, the Open window is displayed. This window allows you to select the files that you want to add to the archive.
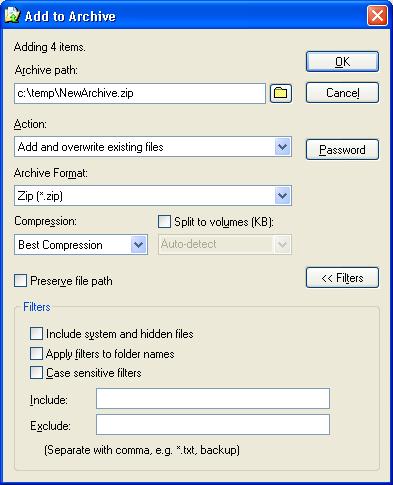
Figure: Select Files for adding to archive From this screen you can select the file(s) you wish to add to the current archive. Once a file is selected, the Add to Archive window is displayed:
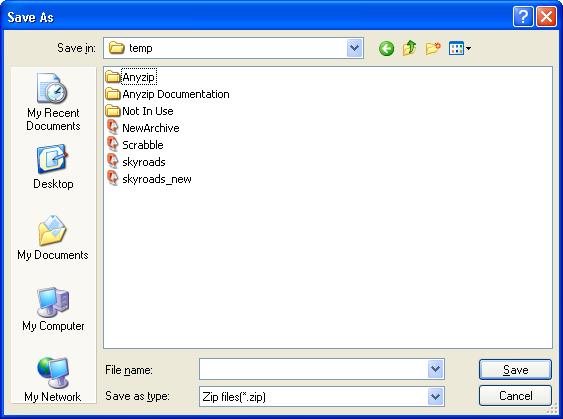
The above screen has the following parameters: Archive path This field displays the path and the location of the archive to which the file is to be added. The location of the archive can either be entered manually or selected using the icon displayed next to this field. Clicking the icon displays the Save As window from where the preferred location for the archive can be selected.
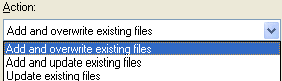
Action The Action option allows you to define what you want to do with the files in the current archive.
The actions that can be performed are:
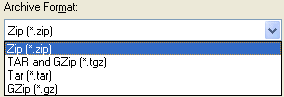
Archive Format The archives can be stored in different formats. The default format is ZIP. The Archive Format allows you to choose the format in which the archive needs to be stored.
Compression
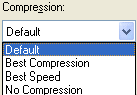
This field allows you to select the degree of compression of a file added to the archive. AnyZip uses the default option to create an archive file which adequately compresses its contents to ensure faster access. Please note that as you increase the Compression, the size of the archive file so created will be smaller. However, this will also mean that opening the archive file will take longer. While the Best Speed and No Compression options will cause the Zip file to be larger but with quick access to its contents, the Best Compression option will result in a smaller zip file which will take longer to create and open. Split to volumes This option is useful if you would like to copy the zip files that you are creating to another machine using floppy disk drives. If the number of files is large and the resultant zip files are likely to be above a certain size (for example, larger than 1.44 MB), you can either specify a maximum size for each resulting zip file. Alternately you can allow AnyZip to use its default options by selecting the Auto-Detect option provided.
It is unchecked by default. This means that AnyZip will create a new archive without making provision for splitting it across more than one disk or storage unit. Further details on creating an archive split across more than one storage unit or disk can be read by clicking here. Preserve File Path Check this option to ensure that when files are extracted form an archive file, they are restored to the same directory path from which they were initially added to the archive. This option is very useful if you are creating an archive file from a directory with one or more levels of sub-directories. When this is checked, the entire path from where the file was added to the archive is stored on the archive and the extraction will ensure that files are extracted to the folder/directory they were initially added from. As you can see from the screenshot provided below, this option is defaulted by the application to ensure that the full path information is retained. Hence, even if you have chosen not to activate this option, it is assumed that your preference is for retaining the full path.
Filters
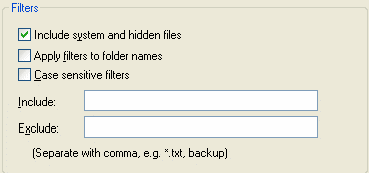
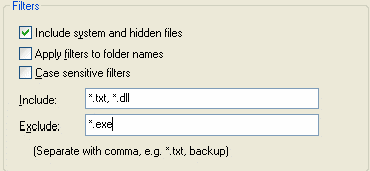
AnyZip allows you to specify filters while adding files to an archive. AnyZip has five filtering options which can be used either jointly or individually i.e. they are not mutually exclusive. These are described below: Include System and Hidden Files Some folders/directories on your computer might contain hidden files. These are files which are required for proper operation of your computer and which are not user-editable. When you select this option, AnyZip will include such files while creating the archive file. Apply filters to folder names By default all the filters that you specify are only applicable to files within the folder or location from where the archive file is being created. However, selecting this option ensures that the filters also apply to all folders which meet the specified filtering option. This option is normally used in conjunction with the Include or Exclude options on this screen and will not affect the creation of the archive file by itself. Case Sensitive Filters If you want AnyZip to make distinction between files based on how they are named i.e. In lower case or UPPER CASE, this option should be checked. When this option is checked, AnyZip treats a file named TEST as being different from a file named Test or test. This option is also normally used with the Include or Exclude filters available on this screen. Include This option helps you select specific files or file types that need to be included while creating the archive file. For example, if you were to type *.txt in this box, AnyZip will ensure that all files having the TXT extension in the main folders and any included sub-folders are included while creating the archive. More than one file type can be included in the archive using this option. In order to do so, the file types can be entered one after the other with each file type followed by a comma, as shown here:
The Include filter specified above will ensure that all files with the TXT or DLL extensions will be included in the archive file that is created through this process. Exclude The Exclude filter allows you to specify what types of files from the source folder are to be ignored while adding files to the archive. As in the case of the Include option this filter also allows you to specify more than one file type while adding files to the archive. As shown in the above example, while adding files to the archive, AnyZip will exclude all files having an EXE extension.
|
||||||||||||
| Copyright (C) 2001-2006 TurboSoft, Inc. | ||
| |
||