Schedule Transfer and Synchronization Using Task Scheduler
Scheduled TurboFTP tasks (including session and sync tasks) can be run as a generic NT service by the Sync Service module (tftpsvc.exe). Using the Sync Service to run pre-configured scheduled tasks does not require a user to log onto the computer and prevents unauthorized users from interfering with or shutting down the scheduling process. The Sync Service supports simultaneous multiple scheduled tasks and offers better performance. When not using the Sync Service module, the scheduled tasks can still run, but the GUI TurboFTP program must run on the desktop, and only one job can run simultaneously.
The Task Scheduler runs two types of scheduled tasks – a queue session task and a synchronization task -- either once or repeatedly. A queue session task loads a session (in the form of .tbx file) into the transfer queue and then transfers those files at a specified time.
A synchronization task automatically performs synchronization between a local and a remote directory with a predefined synchronization scheme. This process is very similar to that of Folder Synchronizer - except that it is done without user intervention.
1. Synchronization Scheduled Task
Create a Synchronization Scheduled Task
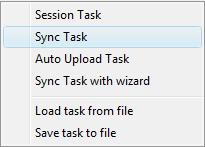
Open Task Scheduler, click on the button Add and choose Sync Task to create a directory synchronization task. At this time, if the program is not connected to any FTP server, a dialog will pop out and allow you to select the target FTP server from the sites stored in your Site Address Book. After that, the Scheduler Task Settings dialog will show up for you to set up the sync task. Before creating a Sync Task, ensure the target server profile is stored in Address Book, with only one server profile with the server address and port.
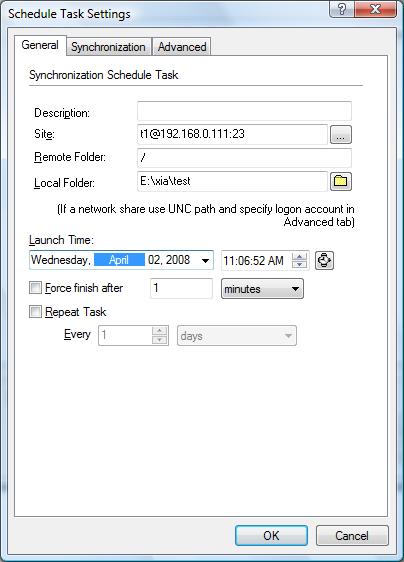
Modify Schedule Settings
Go to the General tab, where you can change the remote folder or local folder for synchronization, and specify the launch time, end time, and task repetition option for each scheduled task.
Modify Synchronization Settings
On the Synchronization tab, you can select the synchronization direction and scheme. And set the options after transferring and filters. The Synchronization tab contains all the options related to the Advanced FTP Site Settings: Scheduled Task Settings | Synchronization.
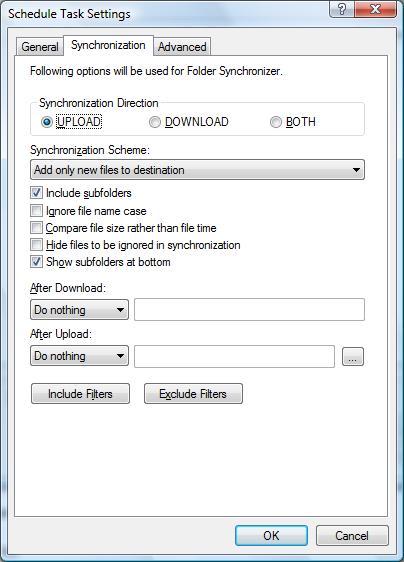
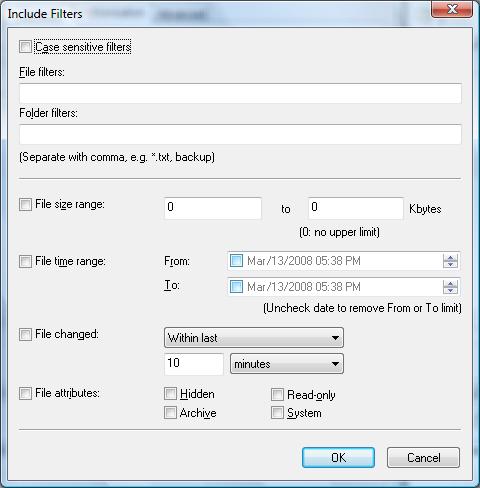
This tab has a button for Include Filters and another for Exclude Filters. Files matching include filters will be included in the synchronization process, while those matching exclude filters will be ignored. The options related to File Filtering For Synchronization.
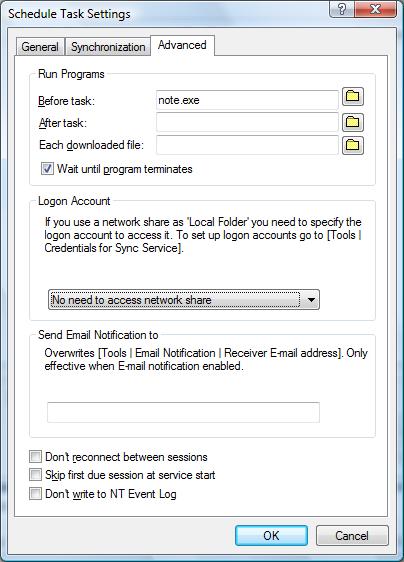
Finally, you can configure some advanced options for a Sync Task on this page. If you are syncing a local folder that is a network share, be sure to select the appropriate pre-configured "Logon Account".
Run a Sync Task
After you create a sync task, the task will automatically be added to TurboFTP Task Scheduler. The task will run according to the Launch time in the General tab. You also can click the button 'Run Now' to run the task immediately.
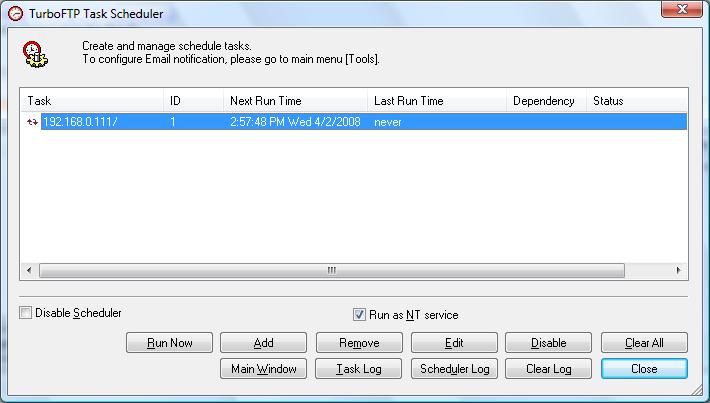
- You can enable the option 'Run as NT service' to start the Sync Service module as an NT service. And then, the Sync Service module takes care of all the scheduled tasks. Using the Sync Service to run pre-configured scheduled tasks doesn't require a user to log onto the computer.
- You can enable the checkbox 'Disable Scheduler' if you want to disable all scheduler tasks.
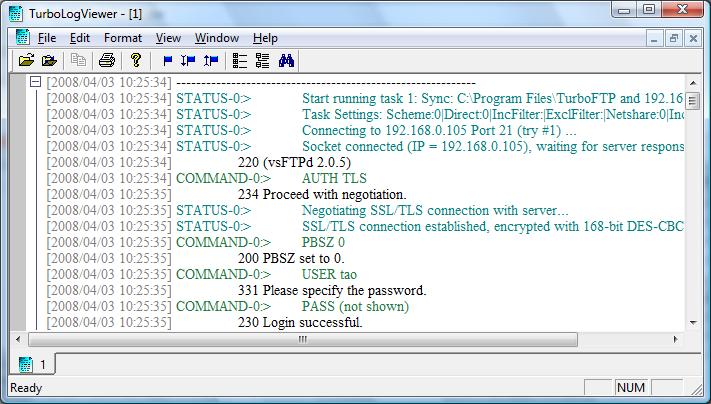
- You can click the Task Log button to view the task log. TurboLogViewer is used for reviewing the Sync Service log.
Task list in the Task Scheduler dialog:
- Task: Description of the task. If you don't enter anything in the Description field in the General tab, it will be the server address combined with the target remote folder.
- ID: Each task has a unique ID number.
- Next Run Time: The time the task will run next.
- Last Run Time: The time the task last ran.
- Dependency: The ID of the task it depends on. A task, by default, has no dependence on any other unless you specify one. A task with a dependency task ID will run when the job it depends on terminates.
Verifying your synchronization options and testing with dummy source or destination files is crucial to ensure it works. Beware that no confirmation is given if files are deleted during the process!
If you must confirm every change before it can be transferred, use the Folder Synchronizer ([Tools | Synchronize folders] manually instead.
2. Session Scheduled Task
Create a Session File
Create a session file containing all the files you want to download or send. Suppose you save your session as c:\Download\archive.tbx. You must log on to the FTP server to create a session file by dragging and dropping files into the queue window (window at the bottom) and then saving it. Be sure to store the FTP site's profile in the FTP Site Address Book so that TurboFTP can obtain the correct user name and password when logging on.
Create and Run a Session Scheduled Task
Open Task Scheduler, click on the button Add and choose Session Task. You will then be asked to pick the .tbx file to use. After that, the Scheduled Task Settings dialog will appear. Specify your preferred launch time and task repetition options. When finished, click OK to save the task. A session file stores the contents of the transfer queue and contains a list of files to transfer. Note that a queue entry can use a wildcard mask, functioning like the mget and mput commands of the Linux FTP command line program.