Introduction
TurboFTP is an FTP client program with an Explorer-like interface. This tutorial will teach you how to use this program within just a few minutes. You can browse remote directories and download or upload files easily with drag-and-drop operations.
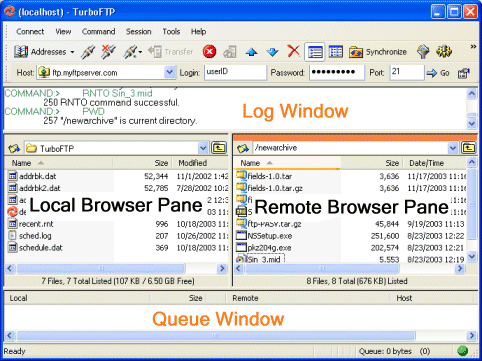
The main TurboFTP window is divided vertically into three frames. The upper frame is the Log Window, which displays dialog between TurboFTP and the FTP server, as well as current status indicators.
The middle frame is divided horizontally into two panes, the Local Browser Pane and the Remote Browser Pane. They display the current local directory and the current remote directory listings interactively.
The Queue Window is across the bottom of the main window, where it maintains a list of items to be transferred and shows the source file name and its path, the destination file name and path, and the remote host address.
|
|
Connecting to an FTP Site
FTP Connection Wizard
FTP'ing will pose no difficulties even if you know nothing of FTP (File Transfer Protocol) or have never used it. The step-by-step guidance of the Connection Wizard [Connect|Connection Wizard] will help you make a connection to an FTP server. Press F1 any time you want more information describing each step.
Address Bar
The Address Bar offers the easiest way to connect to a new FTP server. Supply the server's address, your login, password, and port number (FTP default port is 21), then press Enter (on the keyboard) or click the Go button, and the connection attempt launches. Anonymous login is assumed if the login and password fields are left empty.
![]()
The standard FTP URL format is recognized and automatically parsed when pasted in the address box:
ftp://[user ID:password@]<host name>[:port]/[path name/]
You can access the previously visited sites via the Address Bar drop-down list.
Quick Connect
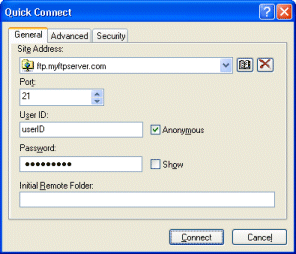
Click the Quick Connect button ![]() on the toolbar or use the menu [Connect | Quick Connect] to open the Quick Connect dialog box. Enter the basic login info for your account on an FTP server in the General tab. If necessary, customize your settings on the Advanced and Security tab. Click the Connect button to connect to the FTP server.
on the toolbar or use the menu [Connect | Quick Connect] to open the Quick Connect dialog box. Enter the basic login info for your account on an FTP server in the General tab. If necessary, customize your settings on the Advanced and Security tab. Click the Connect button to connect to the FTP server.
|
Fig. Quick Connect Dialog |
FTP Site Address Book
The FTP Site Address Book (use toolbar button ![]() or menu [Connect|Address Book]) is recommended to store connection information for frequently accessed servers. Create a new site profile in the Address Book and provide the details to access the FTP server. The Address Book maintains your favorite sites with a tree view (i.e., you can organize them with folders you define). You can even drag and drop to reposition a server or a folder.
or menu [Connect|Address Book]) is recommended to store connection information for frequently accessed servers. Create a new site profile in the Address Book and provide the details to access the FTP server. The Address Book maintains your favorite sites with a tree view (i.e., you can organize them with folders you define). You can even drag and drop to reposition a server or a folder.
Tips: Configure TurboFTP to open the Quick Connect dialog or the Address Book automatically each time it starts. Go to [Options|General|Start With] to make the selection.
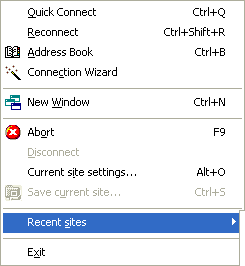
Recently Visited Sites
Press the Reconnect button on the toolbar to view the list of recently visited sites from the drop-down menu; you can select any recently accessed server to which you want to reconnect.
The Connect menu also maintains a list of recently visited servers.
Fig. Connect to a recently visited site with one click |

Tips: You can specify the number of recently visited sites in [Options | Advanced].
Setting Up Secure FTP Connection
TurboFTP supports SFTP over SSH2. SSH (Secure Shell) is a secure extension of the Telnet protocol. It provides a secure transport layer offering strong encryption, server authentication, and integrity protection to all data transferred on top of it. SFTP is a subsystem of an SSH2 server and provides secure file transfer capability based on SSH2. The standard SSH server port is 22.
TurboFTP supports secure FTP over SSL (Secure Socket Layer)/TLS (Transport Layer Security). A secure FTP server offers a high level of connection authenticity, data integrity, and industrial strength data encryption based on the industrial standard SSL/TLS. Thus, it provides reliable, secure file transfer capability over an insecure network.
Before establishing a secure FTP connection, specify [Secure Connection Type] in the [Advanced Site Settings | Security] tab. Select: implicit SSL; explicit encryption (AUTH SSL); explicit encryption (AUTH TLS); or, SFTP over SSH2.
For SSL/TLS based on a secure FTP server: In explicit encryption, the FTP client must send an explicit command (i.e., "AUTH SSL" or "AUTH TLS") to the FTP server to initiate a secure control connection; while in implicit encryption, the client establishes a secure control connection upon contact with the server. Often the server port for implicit SSL is 990. Ask the server administrator or your web hosting service provider for information on which secure connection type or server port your TurboFTP client should use.
Some SSL/TLS-based secure FTP servers require authentication using a client certificate. In this case, you should have been issued your certificate, which includes a certificate file and a private key file. Check the checkbox "Use SSL/TLS client certificate" and supply the file locations. If the private key is encrypted, provide the password as well.
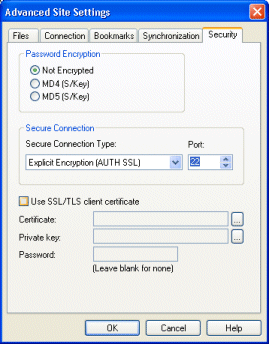
Fig. Security Settings in a Server Profile
Download/Upload Files with TurboFTP
Once connected to an FTP server, it is easy to transfer files with TurboFTP. You have several options to transfer files.
By Mouse Click or Shortcut Key
Select the items to download or upload and then click the toolbar button ![]() or
or ![]() (which can also be accessed through the right-click menu). The selected items are added to the transfer queue, and the transfer starts immediately. The shortcut key is Ctrl+Ins for both download and upload.
(which can also be accessed through the right-click menu). The selected items are added to the transfer queue, and the transfer starts immediately. The shortcut key is Ctrl+Ins for both download and upload.
Drag to Target Location
Drag files from one browser pane to the other to begin the upload/download immediately (confirmation needed).
Add to Queue
Drag files to the queue from the Local Browser Pane (to upload) or the Remote Browser Pane (to download). Then press the Start Transfer Queue button ![]() (or use menu Command|Start transfer) to transfer the queued files. More than one FTP server can be referenced as TurboFTP will automatically connect and log into a new host if necessary to accomplish your job.
(or use menu Command|Start transfer) to transfer the queued files. More than one FTP server can be referenced as TurboFTP will automatically connect and log into a new host if necessary to accomplish your job.
Double-click a file (or folder) in a browser pane to append it to the transfer queue. (Set [View|Options|Advanced|Double click action|Remote (or Local)])
Drag from Windows Shell (e.g., Windows Explorer) to Upload
While TurboFTP is connected to an FTP host, drag files/folders from Windows Explorer or the Desktop. The dropped files are added to the Transfer Queue. Now press the Start Transfer button ![]() to start uploading them.
to start uploading them.
Upload with Shell Menu Send To
Right-click on the file(s) you want to upload in Windows Explorer, and choose [Send To|TurboFTP]. TurboFTP will be launched and prompt for the FTP server to upload to. Select the target host and connect. The selected files will be placed in the transfer queue and uploaded automatically after login. TurboFTP will place the files in the "Initial Remote Directory" (specified in the Address Book) after logging into that host.
|
Fig. An easy way to upload a file from Explorer using TurboFTP |