Folder Synchronizer
Folder Synchronizer allows you to compare, synchronize and clone recursively files and directory structure between a local folder and a remote folder with just minimum mouse clicks.
Start Folder Synchronizer
Connect to an FTP server, browse to the local folder and remote folder you want to synchronize. Select menu [Tools | Synchronize folders...], and you will see the Synchronization Options dialog showing sync options associated with the current server profile. Make changes to the settings if necessary, then press the OK button. TurboFTP will scan the local and remote folders to create a visual comparison result.
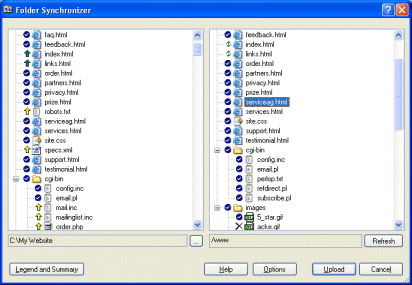
Directory structures of the current local and remote directories are displayed side by side in the Folder Synchronizer dialog. Each item (file or subfolder) on the folder tree is marked with a special image on the left to the file icon to indicate the action for this item. Actions are determined as a result of recursive comparison between the two directories, which is based on the synchronization scheme and other related options defined in the Synchronization tab of the Advanced Site Settings for this site.

Fig. Folder Synchronizer
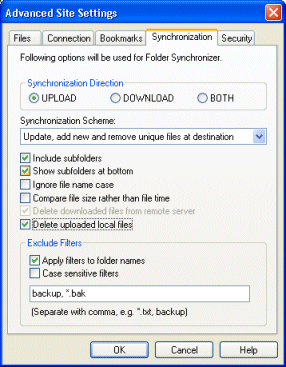
To make things work out as you expect, you must configure the synchronization options properly. You can do so either in [Advanced Site Settings | Synchronization] in the specific site profile (accessible via the Address Book) or by clicking the Options button in the Folder Synchronizer dialog. Both will bring out the property page where you can specify options for synchronization.

Fig. Folder Synchronization Options for an Individual Site
IMPORTANT: Note that if file comparison is based on file date and time, remote file time must be in the same time zone as the local files. Otherwise you need to specify the proper Server time offset in the Files tab of the Advanced Site Settings.
Understanding the Result of Comparison
Following is a breakdown of all possible actions and their associated images:
This file or subdirectory will be deleted
This file or subdirectory will be ignored and kept intact.
Indicates that a local file will be uploaded and added to the remote directory or a new directory of the same name will be created at the remote one.
Indicates a local file will be uploaded to overwrite a file with the same name in the remote directory.
Indicates that a remote file will be downloaded and added to the local directory or a new directory with the same name will be created at the local one.
Indicates that a remote file will be downloaded to overwrite a file of the same name in the local directory.
This file (in the target directory) will be overwritten (updated).
You can review a brief description of these action images by pressing the Legend button. The popup menu also shows the number of files and directories to which an action will be applied. For Delete action, two file numbers will be shown in format [number of local files to be deleted] + [number of remote files to be deleted].
Change Synchronization Options
By clicking on the Options you can change synchronization related options as needed. After changes have been made, the comparison will be renewed.
Change Local Directory
You can change the local directory, either as the source or target of synchronization, by clicking on the browse button (labeled with three dots)..
Refresh Remote Directory
Clicking on the Refresh button will refresh the current remote directory list. When finished, the Folder Synchronizer dialog will appear again to present the result of the renewed comparison.
Modify Action
You can modify the planned action for each item. Available options are:
-
Upload (or Download in the remote directory tree)
-
Delete
-
Ignore
-
Restore
Only options that make sense will be available; other options will be grayed out. For instance, if the synchronization direction is upload, no download is allowed, and the Download option for remote items will always be disabled.
Start Synchronization
After clicking on this button, all files to be transferred will be put into the transfer queue, and transfer will be started automatically. No further user intervention is needed.