Schedule Current Queue
To schedule transfer of current queued files, following the steps below. Note that this scheduled job runs only once. To schedule repeated transfer of a group of files, click here.
1. Queue the Files
Log into the FTP server and fill the transfer queue with the files you want to schedule for upload or download, and then disconnect from this site.
2. Set up the Scheduler
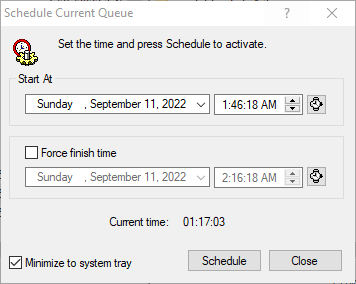
Use menu [Session | Schedule transfer] to open the scheduler. In the Scheduler dialog, you need to specify the date and time you want to start the task. In addition to the start date and time, you can force a finish date and time by checking the Force finish time check Box.
Leave the check box Minimize to system tray selected if you want TurboFTP window to be minimized as an icon on the system tray (on the right side of the Windows taskbar) during scheduling. You can bring up the window again by clicking on the icon. Check the check box to minimize the window again.

Fig. Schedule current queue
3. Start the Scheduler
The countdown will begin after you click the Schedule button. The button will then be changed to an Abort button and can be used to stop the scheduling.
NOTE: TurboFTP will take action specified in [Options|Events] upon completion (either forced or not). For example, if you want TurboFTP to shut down the computer at the end of the scheduled task, choose "Shut down computer". (Auto-Shutdown and Auto-Hangup are also accessible via the toolbar.)